
티스토리 뷰
설치환경
- VMware workstation 9
- OEL 5.4
- Oracle 11.2.0.3
- GI 11.2.0.3
RAC 설치 준비작업
GI와 Database 설치를 위해 group 및 OS user 생성
root User로 접속하여 User Group과 grid, oracle user를 생성해야 한다.
[root@host01 ~]# groupadd dba
[root@host01 ~]# groupadd oinstall
[root@host01 ~]# groupadd oper
[root@host01 ~]# groupadd asmadmin
[root@host01 ~]# groupadd asmdba
[root@host01 ~]# groupadd asmoper
[root@host01 ~]# useradd -g oinstall -G asmoper,asmdba,asmadmin grid
[root@host01 ~]# useradd -g oinstall -G dba,oper,asmdba oracle[root@host01 ~]# passwd oracle --stdin <<ENDPWD
oracle
oracle
ENDPWD
[root@host01 ~]# passwd grid --stdin <<ENDPWD
oracle
oracle
ENDPWD
oracle database 관련 환경변수 추가 작업
User 및 Group 생성 후 모든 Node의 User의 환경 변수에 대해 수정과 추가가 필요하며, Node 별로 ORACLE_SID는 다르게 설정해야 한다. 먼저 Oracle User 환경 변수를 수정해보자.
[root@host01 ~]# vi /home/oracle/.bash_profile# oracle Settings
export ORACLE_BASE=/u01/app/oracle
export ORACLE_HOME=/u01/app/oracle/product/11.2.0.3/dbhome_1
export GRID_HOME=/u01/app/11.2.0.3/grid
export PATH=$ORACLE_HOME/bin:$GRID_HOME/bin:$PATH
export ORACLE_SID=orcl1 --2번 Node의 경우 orcl2
export PS1="[\`echo \$ORACLE_SID\`@\h \W]$ "
unset LANG
Grid Infrastructure 관련 환경변수 추가 작업
다음으로, grid User 환경 변수를 수정해보자.
[root@host01 ~]# vi /home/grid/.bash_profile# grid Settings
export ORACLE_BASE=/u01/app/grid
export ORACLE_HOME=/u01/app/11.2.0.3/grid
export PATH=$ORACLE_HOME/bin:$PATH
export ORACLE_SID=+ASM1 --2번 Node의 경우 +ASM2
export PS1="[\`echo \$ORACLE_SID\`@\h \W]$ "
unset LANG
root 환경변수 추가 작업
[root@host01 ~]# vi /root/.bash_profileexport GRID_HOME=/u01/app/11.2.0.3/grid
export PATH=$GRID_HOME/bin:$PATH
기본 패키지 설치
Oracle 설치 버전에 따라서 요구되는 rpm 패키지가 다르다. 각 패키지에 대한 내용을 확인하기 위해서는 운영 체제 메뉴얼이나 해당 제조업체에 확인해야 한다.
Oracle documents에서 데이터베이스 설치를 위해 사전에 필요한 패키지들을 확인할 수 있다.
Oracle Database Preinstallation Requirements
6/21 2 Oracle Database Preinstallation Requirements This chapter describes the tasks that you must complete before you start Oracle Universal Installer. It includes information about the following tasks: Note: This guide contains information required to in
docs.oracle.com
[root@host01 ~]# yum install -y binutils-2.*
[root@host01 ~]# yum install -y compat-libstdc++-33*
[root@host01 ~]# yum install -y compat-libstdc++-33*.i386.rpm
[root@host01 ~]# yum install -y elfutils-libelf*
[root@host01 ~]# yum install -y gcc-4.*
[root@host01 ~]# yum install -y gcc-c++-4.*
[root@host01 ~]# yum install -y glibc-2.*
[root@host01 ~]# yum install -y glibc-common-2.*
[root@host01 ~]# yum install -y glibc-devel-2.*
[root@host01 ~]# yum install -y glibc-headers-2.*
[root@host01 ~]# yum install -y ksh*
[root@host01 ~]# yum install -y libaio-0.*
[root@host01 ~]# yum install -y libaio-devel-0.*
[root@host01 ~]# yum install -y libgomp-4.*
[root@host01 ~]# yum install -y libgcc-4.*
[root@host01 ~]# yum install -y libstdc++-4.*
[root@host01 ~]# yum install -y libstdc++-devel-4.*
[root@host01 ~]# yum install -y make-3.*
[root@host01 ~]# yum install -y sysstat-7.*
[root@host01 ~]# yum install -y unixODBC-2.*
[root@host01 ~]# yum install -y unixODBC-devel-2.*
[root@host01 ~]# yum install -y numactl-devel-*
[root@host01 rpm]# yum install -y cvuqdisk*
[root@host01 rpm]# yum install -y oracleasm*
[root@host01 rpm]# yum install -y flash-player-npapi*
데이터베이스 설치 사전작업에 필요한 시스템 설정
oracle documents를 참고하여 시스템 설정 작업을 진행한다.
Oracle Database Preinstallation Requirements
6/21 2 Oracle Database Preinstallation Requirements This chapter describes the tasks that you must complete before you start Oracle Universal Installer. It includes information about the following tasks: Note: This guide contains information required to in
docs.oracle.com
Kernel Parameter 설정
도큐먼트 상 요구하는 Kernel Parameter들의 최소 값들보다 높은 수치를 적용한다.
[root@host01 ~]# vi /etc/sysctl.conf# for Oracle Database 11gR2
fs.suid_dumpable = 1
fs.aio-max-nr = 1048576
fs.file-max = 6815744
kernel.shmall = 2097152
kernel.shmmax = 4294967295
kernel.shmmni = 4096
kernel.sem = 250 32000 100 128
net.ipv4.ip_local_port_range = 9000 65500
net.core.rmem_default = 262144
net.core.rmem_max = 4194304
net.core.wmem_default = 262144
net.core.wmem_max = 1048576
Directory 생성 및 권한 부여
[root@host01 ~]# mkdir -p /u01/app/grid
[root@host01 ~]# mkdir -p /u01/app/11.2.0.3/grid
[root@host01 ~]# chown -R grid:oinstall /u01/app
[root@host01 ~]# chmod -R 775 /u01/app/grid
[root@host01 ~]# chmod -R 775 /u01/app/11.2.0.3/grid
[root@host01 ~]# mkdir -p /u01/app/oracle
[root@host01 ~]# chown -R oracle:oinstall /u01/app/oracle
Configure Oracle Installation Owner Shell Limits 1
아래의 명령으로 세션 설정 파일을 편집해야 한다. 각 계정의 Resource limit을 설정하며 설치 계정별로 limit을 부여한다. oracle, grid User를 설치 계정으로 설치하였으므로 oracle, grid User에 Resource limit을 부여한다.
[root@host01 ~]# vi /etc/security/limits.conforacle soft nproc 2047
oracle hard nproc 16384
oracle soft nofile 4096
oracle hard nofile 65536
oracle soft stack 10240
grid soft nproc 2047
grid hard nproc 16384
grid soft nofile 4096
grid hard nofile 65536
grid soft stack 10240
Configure Oracle Installation Owner Shell Limits 2
사용자 인증 모듈로서 사용자 세션 제한이 필요하며 추가 설정이 필요하다.
[root@host01 ~]# vi /etc/pam.d/loginsession required pam_limits.so
Network 설정
Oracle Universal Installer 실행시 만약 host name에 대한 확인이 안되면 에러가 발생할 수 있다.
[root@host01 ~]# vi /etc/hosts127.0.0.1 host01 localhost.localdomain localhost
# Public
192.168.100.111 host01
192.168.100.112 host02
# Private
192.168.200.111 host01-priv
192.168.200.112 host02-priv
# Virtual
192.168.100.113 host01-vip
192.168.100.114 host02-vip
# SCAN
192.168.100.201 cluster01-scan
192.168.100.202 cluster01-scan
192.168.100.203 cluster01-scan- Public IP : 서버 식별 IP이며 Service로 사용은 가능하나 RAC에서는 관리용으로 주로 사용한다. Node별로 필요하다.
- Private IP : Instance와의 통신을 위한 IP로 Interconnet, Heartbeat 등 내부 통신으로 사용한다. Node별로 필요하다.
- VIP : 서비스를 위한 IP이며 장애 발생시 Failover 용도로 사용한다. Node별로 필요하다.
- Scan IP : Load Balancing 용도로 사용하며 이 용도로 미사용할 계획이라면 1개의 IP가 필수로 필요하다.
NTP 설정
양쪽 노드간에 TIME Sync를 위해 Network Protocol Daemon이 반드시 있어야 한다. Daemon만 수행하면 기본 옵션에
-x가 없기 때문에 에러가 나서 Synchronizing를 설정 할 수 없다. 따라서 아래와 같이 수정한다.
[root@host01 ~]# vi /etc/sysconfig/ntpdOPTIONS="-x -u ntp:ntp -p /var/run/ntpd.pid"
NTP 비활성화
[root@host01 ~]# service ntpd stop
[root@host01 ~]# chkconfig ntpd off
Name Service Cache Daemon 활성화
[root@host01 ~]# service nscd start
[root@host01 ~]# chkconfig nscd on
[root@host01 ~]# service iptables stop
[root@host01 ~]# chkconfig iptables off[root@host01 ~]# service sendmail stop
[root@host01 ~]# chkconfig sendmail off [root@host01 ~]# getenforce disabled
디스크 확인 및 준비
fdisk로 파티션을 생성한다.
[root@host01 ~]# fdisk -l[root@host01 ~]# fdisk /dev/sdb
...
Command (m for help): n
Command action
e extended
p primary partition (1-4)
p
Partition number (1-4): 1
First cylinder (1-1958, default 1):
Using default value 1
Last cylinder or +size or +sizeM or +sizeK (1-1958, default 1958):
Using default value 1958
Command (m for help): w
나머지 디스크들도 똑같은 작업 수행
[root@host01 ~]# fdisk /dev/sdc
...
[root@host01 ~]# fdisk /dev/sdd
...
[root@host01 ~]# fdisk /dev/sde
...
[root@host01 ~]# fdisk /dev/sdf
...
[root@host01 ~]# fdisk /dev/sdg
...
[root@host01 ~]# fdisk /dev/sdh
...
[root@host01 ~]# fdisk /dev/sdi
...
ASM 디스크 준비
[root@host01 ~]# oracleasm configure -i

Default user to own the driver interface []: grid
Default group to own the driver interface []: asmadmin
Start Oracle ASM library driver on boot (y/n) [n]: y
Scan for Oracle ASM disks on boot (y/n) [y]: y
Writing Oracle ASM library driver configuration: done
[root@host01 ~]# oracleasm exit
[root@host01 ~]# oracleasm init[root@host01 ~]# oracleasm createdisk ASMDISK01 /dev/sdb1
[root@host01 ~]# oracleasm createdisk ASMDISK02 /dev/sdc1
[root@host01 ~]# oracleasm createdisk ASMDISK03 /dev/sdd1
[root@host01 ~]# oracleasm createdisk ASMDISK04 /dev/sde1
[root@host01 ~]# oracleasm createdisk ASMDISK05 /dev/sdf1
[root@host01 ~]# oracleasm createdisk ASMDISK06 /dev/sdg1
[root@host01 ~]# oracleasm createdisk ASMDISK07 /dev/sdh1
[root@host01 ~]# oracleasm createdisk ASMDISK08 /dev/sdi1[root@host01 ~]# oracleasm scandisks
[root@host01 ~]# oracleasm listdisks[root@host01 ~]# shutdown -h now
VMware 종료 후 RAC1 이미지 복사하여 RAC2 생성

VMware에서 RAC1을 제거하고 VMware도 종료한다.

RAC1 폴더에 있던 파일들을 모두 복사해서 RAC2로 붙여넣는다.

RAC2 폴더의 vmx 파일을 메모장으로 열어서 수정한다.

displayName, nvram, extendedConfigFile의 “RAC1”을 “RAC2”로 바꾸어야 한다.

RAC2의 “RAC1”으로 된 파일명들을 모두 “RAC2”로 변경해준다.
VMware 를 다시 열어서 RAC1, RAC2 모두 open하고 RAC2를 power on 한다.
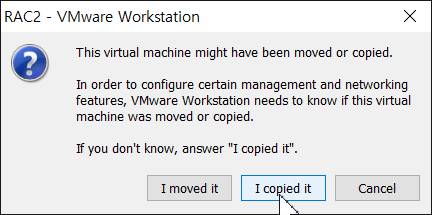
반드시 “I copied it” 클릭!!
'copied it' 클릭하면 Network 설정이 다 날아간다. RAC2는 새로 설정해 주어야 하기 때문에 copied it!!

리눅스 가상머신 상단 메뉴바의 [System] - [Administration] - [Network] 클릭.

원래 4개의 상태가 보여야 하는데 eth0.bak이 안보인다(뭔가 잘못됨).
위에서 RAC2 power on 했을 때, “I copied it” 선택 안하면 이런일이 생긴다고 한다.
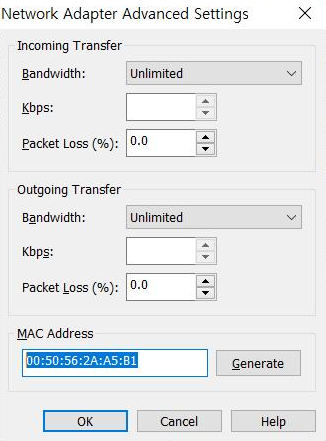
RAC1과 RAC2의 Settings에서 Network Adapter(NAT, Host-only) - [Advanced]를 클릭하여 Mac Address를 확인한다.
*RAC1과 RAC2의 Mac Address는 달라야 함
만약 Mac Address가 같을 경우엔 RAC2의 Network Adapter(NAT, Host-only) - [Advanced] 클릭하여
Mac Address를 [Generate] 한다.


RAC2를 다시 power on 하고
리눅스 상단 메뉴바의 [System] - [Administration] - [Network] 클릭하면
4가지 상태가 잘 보이는 것을 확인할 수 있다.

오른쪽 위의 [Deactivate] 눌러서 모두 Inactive 상태로 만들어 준다.

eth0.back과 eth1.bak 둘 다 [Delete]로 삭제해준다.

eth0의 [Edit] 버튼 눌러서 위와 같이 설정해 준다.

eth1도 [Edit] 버튼 눌러서 위와 같이 설정해 준다.
*eth0은 Public 네트워크(NAT), eth1은 Private 네트워크(Host-only) 로 설정

eth1의 DNS 설정.

왼쪽 상단 메뉴바의 [File] - [Save] 클릭.

[Activate] 버튼 클릭하여 eth0과 eth1 둘 다 Active 상태로 만들어 준다.
연결이 잘 되었는지 ping 보내서 확인한다.
[root@host01 ~]# oracleasm status
[root@host01 ~]# oracleasm listdisks

[root@host01 ~]# ping 192.168.100.111 -c 2		--자기 자신
[root@host01 ~]# ping 192.168.100.112 -c 2
[root@host01 ~]# ping 192.168.200.111 -c 2		--private
[root@host01 ~]# ping 192.168.200.112 -c 2
[root@host01 ~]# ping host01  -c 2
[root@host01 ~]# ping host02  -c 2
[root@host01 ~]# ping host01-priv  -c 2
[root@host01 ~]# ping host02-priv  -c 2
[root@host01 ~]# ssh host02
The authenticity of host 'host02 (192.168.100.112)' can't be established.
RSA key fingerprint is 31:6a:47:54:90:5e:c9:b7:d6:1c:41:46:3f:ff:6c:d9.
Are you sure you want to continue connecting (yes/no)? yes
Warning: Permanently added 'host02,192.168.100.112' (RSA) to the list of known hosts.
root@host02's password:
[root@host02 ~]# oracleasm status
[root@host02 ~]# oracleasm listdisks
[root@host02 ~]# ping 192.168.100.111 -c 2
[root@host02 ~]# ping 192.168.100.112 -c 2
[root@host02 ~]# ping 192.168.200.111 -c 2
[root@host02 ~]# ping 192.168.200.112 -c 2
[root@host02 ~]# ping host01 -c 2
[root@host02 ~]# ping host02 -c 2
[root@host02 ~]# ping host01-priv -c 2
[root@host02 ~]# ping host02-priv -c 2
RAC2의 환경변수 수정
RAC2 instance의 oracle과 grid 환경 변수를 아래와 같이 수정해준다.
[root@host02 ~]# vi /home/oracle/.bash_profile export ORACLE_SID=orcl2
[root@host02 ~]# vi /home/grid/.bash_profile export ORACLE_SID=+ASM2
oracle 홈페이지에서 다운받은 oracle database, grid 파일의 압출을 푼다.
[root@host01 ~]# mkdir /stage
[root@host01 ~]# cd /mnt/hgfs/share

[root@host01 share]# unzip  p10404530_112030_Linux-x86-64_1of7.zip -d /stage
[root@host01 share]# unzip  p10404530_112030_Linux-x86-64_2of7.zip -d /stage
[root@host01 share]# unzip  p10404530_112030_Linux-x86-64_3of7.zip -d /stage
[root@host01 share]# chown -R oracle:oinstall  /stage
2 Node RAC 설치 준비 및 설치가 완료되었다. 이제 GI, ASM Disk group을 생성해보자.
Oracle 11g RAC 설치(2Node) 3 - GI, ASM Diskgroup
설치환경 - VMware workstation 9 - OEL 5.4 - Oracle 11.2.0.3 - GI 11.2.0.3 Grid Infrastructure란? Oracle Clusterware 및 ASM으로 구성되며 운영체제와 긴밀하게 통합된 software 계층이다. Oracle Infrastru..
myalpaca.tistory.com
'ORACLE > RAC' 카테고리의 다른 글
| Oracle ASM (2) | 2020.07.24 |
|---|---|
| Oracle RAC 개념(Cluster, 구성요소) (0) | 2020.07.23 |
| Oracle 11g RAC 설치(2Node) 4 - DB 구성, RAC 설치 후 작업 (3) | 2020.07.16 |
| Oracle 11g RAC 설치(2Node) 3 - GI, ASM Diskgroup (1) | 2020.07.16 |
| Oracle 11g RAC 설치(2Node) 1 - 디스크 추가 (2) | 2020.07.16 |